It’s not that uncommon when you see a yellow triangle with an exclamation mark over the battery symbol residing in the System Tray of Windows 11/10. However, noticing it immediately after a purchase can leave you worried. That said, it doesn’t necessarily mean you have to replace the battery.
![]()
What does a yellow triangle with an exclamation mark mean on my laptop?
A yellow triangle with an exclamation mark in Device Manager on your laptop indicates a driver issue. This symbol means there’s a missing or incompatible driver that requires attention.
Yellow triangle with an exclamation mark on Battery icon in Windows laptop
If you notice the yellow triangle, run the Power Troubleshooter. If the tool can fix the issue, then there is no further explanation as to what is causing the issue, follow a different course of action. We have outlined three ways that might help you in this regard.
- Run the Power Troubleshooter
- Manually restore Defaults for the Power Plan
- Uninstall or Reinstall the Battery Driver
Let us proceed and try these options to get rid of the Laptop battery showing the yellow triangle.
1] Run the Power Troubleshooter
This Power Troubleshooter will automatically troubleshoot Windows power plans and detects your system settings that can affect power usages, such as timeout and sleep settings, display settings, and screensavers, and restore them to their default settings.
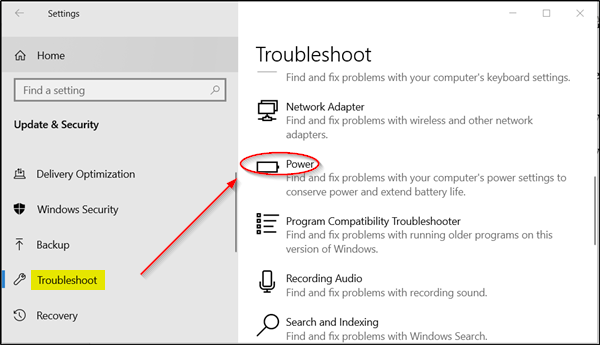
To run the Power Troubleshooter, open Windows Settings and select ‘Update and Security’ tab.
Next, under ‘Update and Security’ heading, look for the ‘Troubleshoot’ option. When found, select the option, scroll down and choose ‘Power’.

Press ‘Run the troubleshooter’ button and wait for few seconds to allow the troubleshooter to detect issues.

After that, follow on-screen directions.
If the tool can fix the issue well, read on.
Read: Laptop Battery Test software & Diagnostic tools
2] Manually restore Defaults for the Power Plan
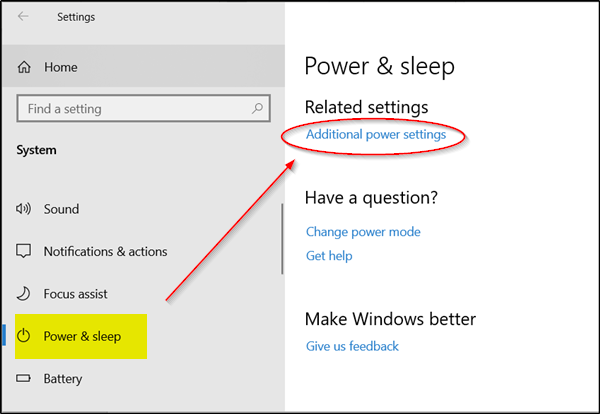
Open Windows Settings again, select ‘System’ tab and scroll down to locate the ‘Power & Sleep’ option.

Now, in the right-pane, click on the ‘Additional power settings’ to open Power Options.

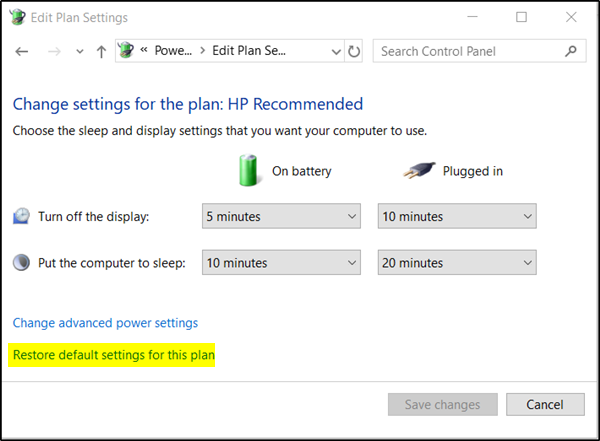
Next, click ‘Change Plan Settings’ link and choose ‘Restore default settings for this plan’.
Read: Laptop Battery indicator icon showing battery as empty in spite of being full
3] Uninstall or Reinstall the Battery Driver
If all the above methods fail to yield the desired results, try this method as a last resort.
Before proceeding, shut down your computer, detach the power chord and remove the battery. (If the battery comes fixed, do not remove it).
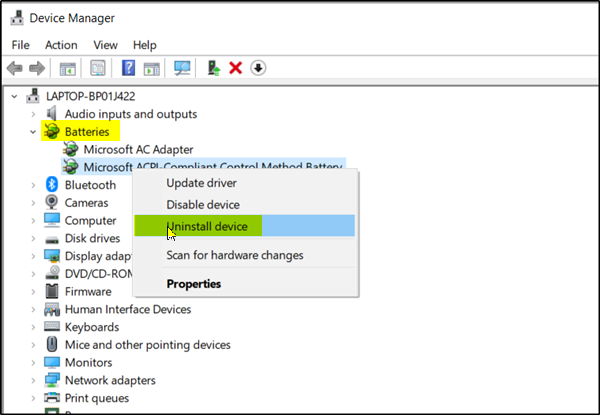
Plug the power chord and reboot your computer. After that, access ‘Device Manager, expand ‘Batteries’, right-click ‘Microsoft ACPI-Compliant System’ and choose ‘Uninstall device’.

Finally, Shut down the computer, Remove the power cord, Attach your battery, and> Reboot the computer to install the driver automatically.
If you wish, you can download the Battery driver from the manufacturer and install it.
You can also use the dedicated software developed by your laptop’s manufacturer to update the battery driver. Some of the software include:
If nothing helps, you may want to check if you need to replace your laptop battery.
I hope this fixes your problem.
What is the triangle on my laptop battery warning?
The yellow triangle warning on your laptop battery typically indicates a low battery level. When your battery charge falls below 10%, Windows may display this symbol to alert you to plug in your charger soon. This warning helps prevent unexpected shutdowns by reminding you to connect your laptop to a power source.
Related: