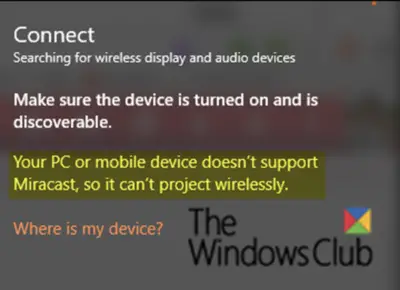
Some Windows 11/10 PC users have been encountering the Your PC or mobile device doesn’t support Miracast, so it can’t project wirelessly error when trying to connect through a Microsoft Wireless Display Adapter using Miracast. Most affected users report that this error occurs even after they’ve made sure that they meet all the requirements to run Miracast. In today’s post, we will explore the causes and possible solutions to this issue.
Your PC doesn’t support Miracast
You may encounter this Miracast issue for the following reasons:
- Intel Graphics Hardware is disabled.
- Wi-Fi is turned off.
- One of the devices is not capable of using Miracast.
- The wireless adapter is forced to 5 GHz.
- Cisco AnyConnect or similar software is stopping the Miracast connection. The Miracast connection may fail to establish because third-party software with an integrated VPN feature was flagging the Micracast technology as a “Split Tunnel” security risk.
To resolve this issue, you can try the following suggested solutions in no particular order:
1. Make sure that Wi-Fi is enabled on both devices
2. Enable Intel Integrated Graphics and update it to the latest version
3. Change the wireless adapter to Auto
4. Disable any active VPN solution
5. Uninstall/Reinstall the Wireless Network Adapter driver
Now, let’s delve into the detailed troubleshooting steps.
How to check if your PC supports Miracast?
Before proceeding with the troubleshooting steps outlined above, verify if your PC is Miracast compatible. Two main components power a Miracast connection – network and graphics.
Begin by conducting a couple of tests to determine whether your system can support a Miracast connection. First, see if your network adapter is compatible, and then verify if your graphics drivers are equipped to support Miracast.
Here’s how:
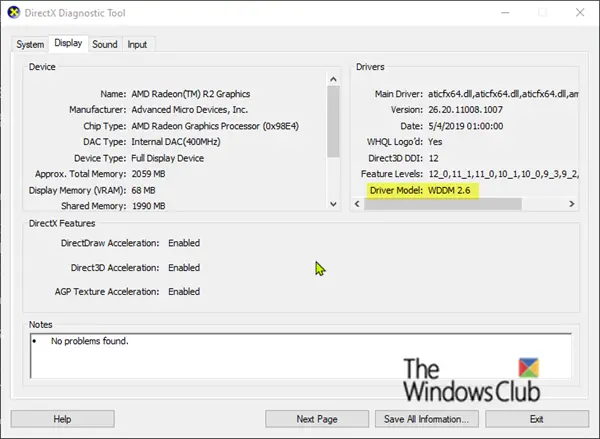
- To test the graphics drivers, run DirectX Diagnostic Tool (dxdiag).
- Once the DirectX Diagnostic Tool page is opened, click on the Display tab and look at the bottom of the Drivers column on the right pane for the Driver Model. If the driver model does not state WDDM 1.3 or above, your system cannot accommodate a Miracast connection.
- You can exit the DxDiag page.
- Next, right-click Start and select Windows PowerShell to launch the PowerShell window.
- Copy and paste the command below into the Powershell window, and hit Enter to verify if you have the right network adapter driver version:
Get-netadapter|select Name, ndisversion
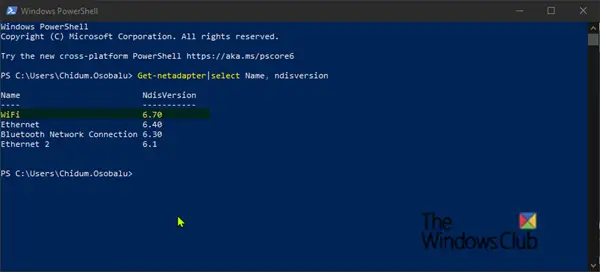
- If the returned NdisVersion is above 6.30, your PC is equipped to support Miracast from a network perspective.
- You can exit the Powershell window.
Note: If your NdisVersion is under 6.3, you can open Device Manager and then try updating your Wireless Network Adapter driver. If that doesn’t work, you can stop following the rest of the procedures below because your device is not compatible with Miracast.
1] Make sure that Wi-Fi is enabled on both devices
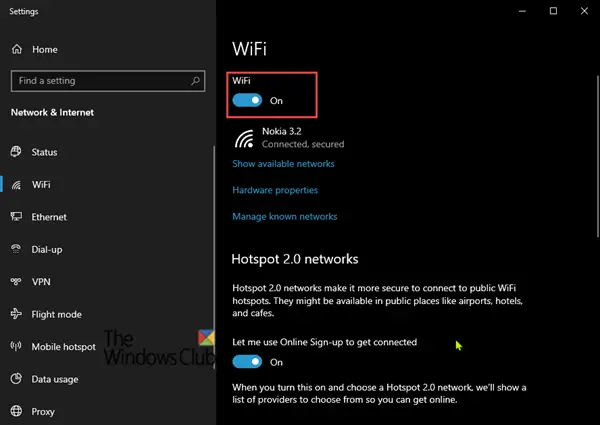
Miracast uses Wi-Fi Direct, so you don’t necessarily need to connect both devices to the same network. However, you do need to ensure that Wi-Fi is enabled on all devices.
- To ensure Wi-Fi is enabled on a Windows 10 PC, press the Windows key + R to open the Run dialog box.
- Copy and paste ms-settings:network-wifi and hit Enter to open the Wi-Fi tab of the Network & internet Settings menu.
- Ensure the toggle button associated with Wi-Fi is turned On in the Wi-Fi tab.
Users will also need to check Wi-Fi is enabled on the other device. How exactly users do that varies from device to device, but users can usually adjust Wi-Fi settings on iOS and Android platforms from the Settings menu.
TIP: This post will help you if Miracast is not working on Windows 10 after an Update.
2] Enable Intel Integrated Graphics and update it to the latest version
You need a supported Intel integrated graphics card in order to create a Miracast connection, the issue might occur because the integrated graphics solution is disabled from your BIOS settings.
- To access your BIOS settings, you’ll need to press the BIOS key at the beginning of the startup procedures. You can also search online with “bios key + your motherboard manufacturer“.
- Once you enter your BIOS settings, look for an Advanced (Expert settings, or something similar) menu and look for an entry named Advanced Chipset Settings or something similar.
- Next, select SouthBridge Configuration and change the Primary Graphics Adapter to IGP > PCI > PCI-E.
3] Change the wireless adapter to Auto
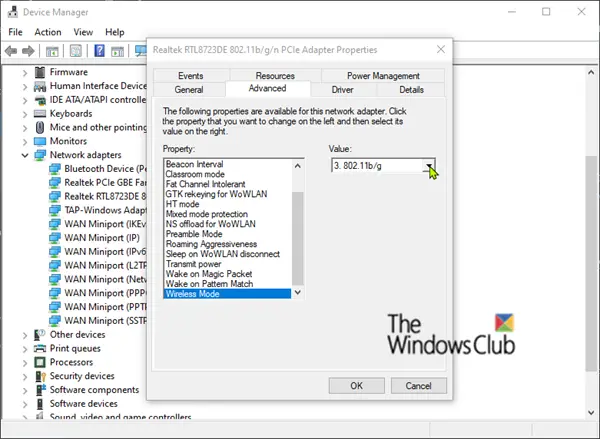
It is known that users might experience the Your PC doesn’t support Miracast error because their wireless adapter was forced to 5Ghz or 802.11blg instead of being set to Auto.
In this case, you can rectify the issue easily by setting the Wireless Mode selection back to Auto.
Here’s how:
- Right-click Start, then select Device Manager.
- In Device Manager, click the chevron on the Network adapters category to collapse the section.
- Then right-click the wireless network adapter listed there and select the Properties option.
- Click the Advanced tab.
- Scroll and select the Wireless Mode property.
- Then select Auto on the Value drop-down menu.
- Click OK and wait until the network connection is restored.
Then restart your computer and check if you are able to use the Miracast feature.
4] Disable any active VPN solution
Several third-party VPN solutions (including Cisco AnyConnect) are rejecting WiFi Direct (the underlying technology behind Miracast). Typically, these third parties will enable WiFi Direct as a Split Tunnel security vulnerability, forcing the system to disable the functionality.
In this case, the only way to test whether this scenario is occurring in your particular situation is to disable Cisco AnyConnect or similar software, restart your machine and see if you are able to create a Miracast connection.
5] Uninstall/Reinstall the Wireless Network Adapter driver
Here, uninstalling and then reinstalling the wireless network adapter driver might resolve the Your PC or mobile device doesn’t support Miracast error.
Related read: OpenGL apps do not run on the Miracast wireless display.
And that’s it, folks! Hopefully, any of these solutions will resolve the issue for you.
Leave a Reply