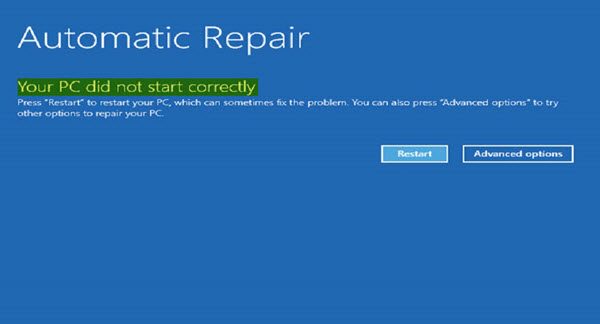
Have you ever encountered a problem where your Windows PC does not start properly after booting it? It may happen after a sudden power failure or after upgrading your PC to a newer version. On turning on your computer, instead of booting to Desktop normally, Windows 11/10 displays an Automatic Repair screen with a message Your PC did not start correctly. Your computer may display Preparing Automatic Repair followed by Diagnosing your PC before finally flashing the Your PC did not start correctly message.

This error is similar to Error 0xc000021a or 0xc0000001, Your PC couldn’t start correctly and the first recommendation would be to restart your PC and see if it helps. But sometimes, this problem may persist even after multiple reboots. A corrupted MBR or BCD file or hardware changes could possibly be the cause.
Your PC did not start correctly
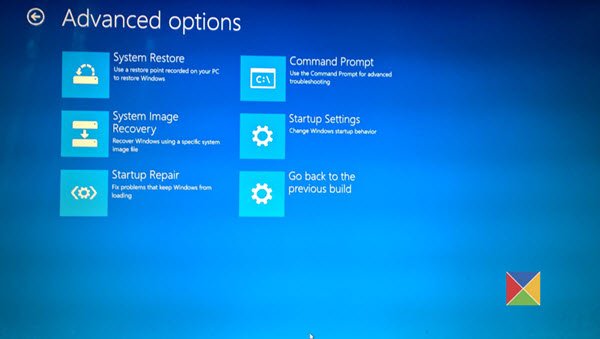
If the message continues, these troubleshooting steps may help you resolve the issue. The next thing you want to do is to click on Advanced options button, following which you will see the following screen under the Advanced Startup Options menu.

Now to fix the Your PC did not start correctly error message, you have the following options:
- See if a System Restore helps you
- Run Startup Repair and see if it helps
- Open Command Prompt and run System File Checker
- Run DISM
- Repair MBR & BCD.
Let us see each of these suggestions.
1] Run System Restore
Click on System Restore and restore your computer back to a prior good point and see if that helps.
Related: The operating system is not presently configured to run this application.
2] Run Startup Repair
Click on the Run Startup Repair button to initiate the repairing process. Check if this helps.
TIP: See this post if Automatic Repair fails and PC fails to boot.
3] Run System File Checker
Click on the Command Prompt button to open a CMD window. Type sfc /scannow and hit Enter to run the System File Checker.
This scans the system for possible errors on the system and attempts to repair them. You will be asked to restart once the scan runs successfully.
TIP: See this post if the scan gives you a Windows Resource Protection found corrupt files but was unable to fix some of them message.
4] Run DISM
Again open the Command Prompt, type Dism /Online /Cleanup-Image /RestoreHealth and hit Enter to Run the DISM tool that will help repair the Windows image.
FIX: BIOS Power-On Self-Test (POST) errors.
5] Repair MBR & BCD
Once again use the Command Prompt to rebuild your MBR, using the built-in bootrec tool. MBR or Master Boot Record is the data that is present in the first sector of any hard disk. It tells where the operating system is located so that it can be loaded.
BCD or Boot Configuration Data is a firmware-independent database file that has boot-time configuration data. It is required by Windows Boot Manager and replaces the boot.ini that was used by NTLDR earlier. In the case of boot problems, you may be required to rebuild this file.
To rebuild the BCD file, in the Command Prompt, type the following command and hit Enter:
bootrec /rebuildbcd
This will scan for other operating systems and lets you select the OSs you want to add to BCD.
Rebuilding the MBR and BCD is usually known to help in such cases.
See this post if you receive a Your PC needs to be repaired message.
I rebuild the bcd file and it said “the operation completed succesfully” after that what should I do?
I think that this also happens when there is a power shortage and the PC is running.
NONE OF THEM WORKED!
When I clicked advanced options, I didn’t get the same options as the picture shown. The options I have are “Use a Device” “Troubleshoot” and “Turn off your PC” I’ve tried all of these options as well as restarting my pc multiple times and nothing has worked.
I’ve tried everything here. Still stuck with the problem.
If any of you solved this in another way please help me out.
THanks
I did the same ? But still it doesnt work ??