In a Windows operating system, an Administrator account is an account that allows a user to make changes that require administrative permissions. An Administrator has more rights on a Windows OS as compared to the users with a local account. For example, the users with a local or standard account can access files and folders on their own user space, make system changes that do not require administrative permissions, install and uninstall programs, etc. On the other hand, an Administrator can change security settings, install and uninstall software, add and remove users, make changes to other user accounts, etc. In short, to perform the tasks that require administrative permissions, you should be logged in as an Administrator. In this tutorial, we will see how to log in as an Administrator in Windows 11/10.
How to login as an Administrator in Windows 11/10
Every Windows computer has a Local Administrator account that is created at the time of Windows installation. As described above, the Administrator has full access to the Windows device as compared to other standard users. The Administrator can also create new and delete the existing users and change the user account permissions. You can log in as an Administrator in Windows 11/10 by:
- Using the existing Administrator Account
- Enabling the built-in Administrator account
- Creating a new Local Administrator account
- Changing the local or standard into an Administrator account
Let’s see all these methods in detail.
1] Using the existing Administrator Account

If you are starting your PC then locate the Administrator account and use the password to login.
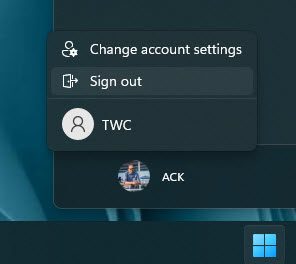
If you are currently not logged in as an administrator and want to change to an admin, open Start, click on the user icon, select Sign out and then log into the Admin account by using its password.
2] Enabling the built-in Administrator account
The Windows OS has a built-in Administrator account. In Windows 11/10 and Windows Server 2016, the built-in Administrator account is disabled at the time of Windows installation and another local account is created which is the member of the Administrators group.
The built-in Administrator account is also called the Super Administrator account. If we compare the built-in Administrator account with the Local Administrator account, the built-in Administrator account has elevated privileges. This means when you perform the administrative tasks, you will not get the UAC prompt. Apart from that, if you want to do some serious troubleshooting on your Windows machine or if you want to recover your main account or another user account, you can use the built-in Administrator account.
Because the built-in Administrator account does not show the UAC prompt, any application can have full control over your system. Therefore, running this account on a regular basis can be risky. You should enable the built-in Administrator account only if you have to do some troubleshooting or recover other user accounts. After performing your task, you should disable it.
As explained above, every Windows OS has a Local Administrator account which is created at the time of Windows installation. Hence, you have to sign in to that Local Administrator account in order to enable the built-in Administrator account. After enabling the built-in Administrator account, you can login as an Administrator in Windows 11/10.
3] Creating a new Local Administrator account
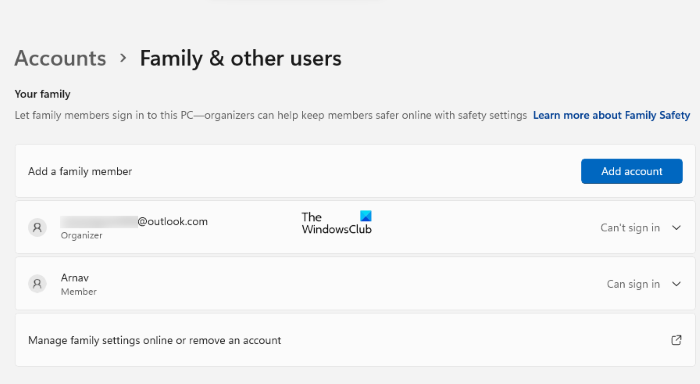
Every Windows 11/10 computer has a default Local Administrator account which is created at the time of Windows installation. Using that account, you can create another Local Administrator account for another user. To do so, open the Accounts page in your Windows 11/10 Settings and then click on the Family & other users option. Now, you have two options:
- You can create a Local Administrator account for your family member.
- You can create a Local Administrator account for a person who is not your family member.
Let’s see how to create a Local Administrator account for a family member and other users.
Create a Local Administrator account for your family member
You can use this option if you have another Microsoft account and you want to add that account as an Administrator to your Windows computer.
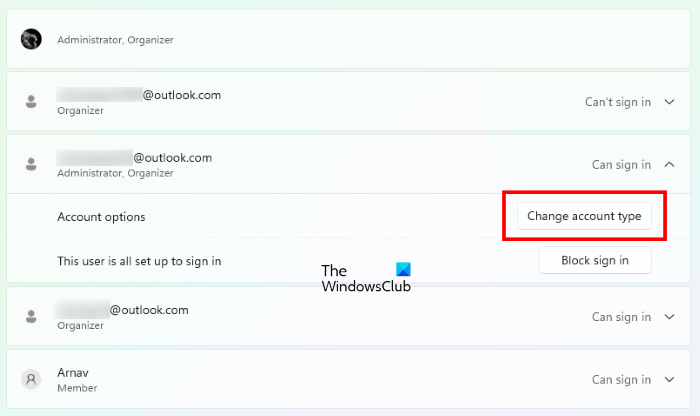
- On the Family & other users page in Windows 11/10 Settings, click on the Add account button next to the Add a family member option.
- Enter the email address of the family member and click Next.
- Select the role (organizer or member) and click Invite. After that, an invite will be sent to the email address.
- Open the email address and accept the invitation. After accepting the invitation, that account will be added automatically to your Windows device.
- Now, open the Family & other users page in WIndows 11/10 Accounts settings and select the newly added account.
- Click Change account type and select Administrator in the drop-down and click OK.
Now, you can login as an Administrator in Windows 11/10 using that account.
Create a Local Administrator account for a person who is not your family member
If you do not have another Microsoft account, you can still create a Local Administrator account. This time, you have to add an account in the Other users section on the Family & other users page. The steps are as follows:
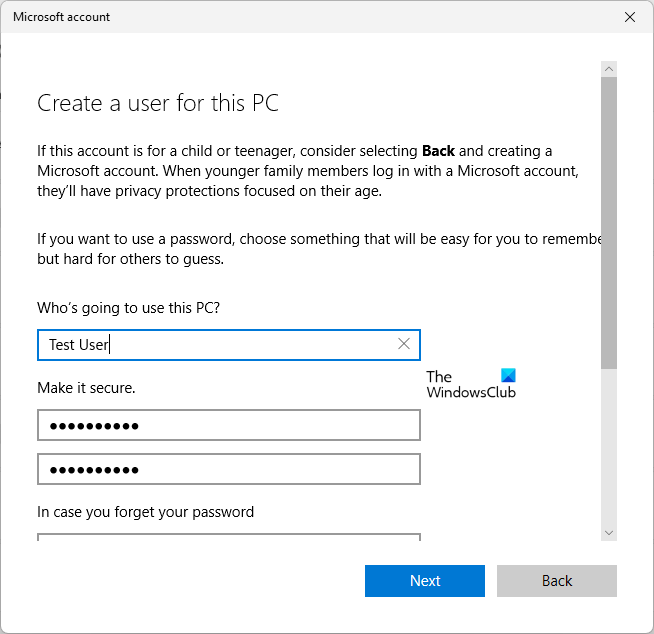
- Open the Family & other users page in Windows 11/10 Accounts settings.
- Click on the Add account button next to Add other user.
- You will be prompted to enter your email address. Click on the I don’t have this person’s sign-in information link.
- Now, click Add a user without a Microsoft account.
- Enter your username and password. After that, select the security questions and type your answers.
- Click Next.
- Now, select the newly created account and click Change account type.
- Select Administrator in the drop-down and click OK.
Now, you can use this account to login as an Administrator in Windows 11/10.
Read: How to rename built-in Administrator Account in Windows.
4] Changing the local or standard account into an Administrator account
If you already have created a local account on your Windows machine, you can change its type and use that account to login as an Administrator. The steps to change the local account to an Administrator account are as follows:
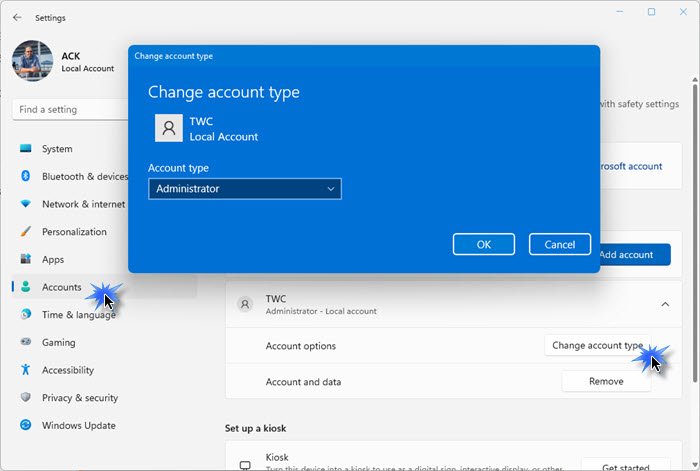
- Open the Family & other users page in Windows 11/10 Accounts settings.
- Select the local user account under the Other users section.
- Click on the Change account type button and select Administrator in the drop-down.
- Now, click OK.
How do I log onto my computer as an Administrator?
At the time of Windows installation, a Local Administrator account is created automatically. You can use that account to log onto your computer as an Administrator. Apart from that, you can also enable the hidden or built-in Administrator account or create an additional Local Administrator account.
We have explained all these methods above in this article.
How do I run Windows as an Administrator?
To run Windows as an Administrator, you should have an Administrator account. There are different methods by which you can create an Administrator account. In addition to this, you can also enable the built-in Administrator account. But it is not recommended to use the built-in Administrator account on a regular basis due to security issues.
This is all about how to log in as an Administrator in Windows 11/10.
Read next: How to fix the disabled Administrator account on Windows 11/10.